

How to Tie a Bow Tie is a question that we often encounter. A well-tied bow tie has a certain charm that a pre-tied version simply can’t match. Whether you’re dressing for a wedding, gala, tuxedo event, or formal dinner, knowing how to tie a bow tie adds a level of confidence and sophistication to your appearance.
- Why Learn to Tie a Bow Tie Yourself?
- Before You Start
- How to Tie a Bow Tie: Step-by-Step Instructions
- Step 1: Drape the Bow Tie Around Your Neck
- Step 2: Cross the Longer End Over the Shorter End
- Step 3: Pull the Longer End Through the Neck Loop
- Step 4: Form the Front Bow Shape
- Step 5: Drop the Longer End Over the Center
- Step 6: Create the Back Bow
- Step 7: Push the Folded End Through the Loop
- Step 8: Tighten and Adjust
- How Long Does It Take to Learn?
- Styling Tips for Different Occasions
- FAQ
- Conclusion
The good news? Tying a bow tie isn’t nearly as complicated as it looks.
Most people struggle because they try to memorize complicated diagrams. In reality, the process is surprisingly similar to tying a shoelace, just with a few extra adjustments to create the signature butterfly shape.
Why Learn to Tie a Bow Tie Yourself?
A self-tied bow tie offers several advantages:

- Looks more authentic and elegant than a pre-tied version
- Creates a slightly imperfect shape that adds character
- Allows you to adjust the size and symmetry
- Demonstrates attention to detail and personal style
- Works for black-tie events, weddings, and formal occasions
Many style experts agree that the slight asymmetry of a hand-tied bow tie is part of its appeal. Perfectly symmetrical knots often signal a pre-tied tie.
Before You Start
Choose the Right Bow Tie. A self-tie bow tie should:
- Match your neck size
- Be adjustable
- Sit comfortably under your shirt collar
- Have enough length to complete the knot without excessive fabric
Your first few attempts will be much easier with a mirror. Give yourself five to ten minutes if you’re learning for the first time.
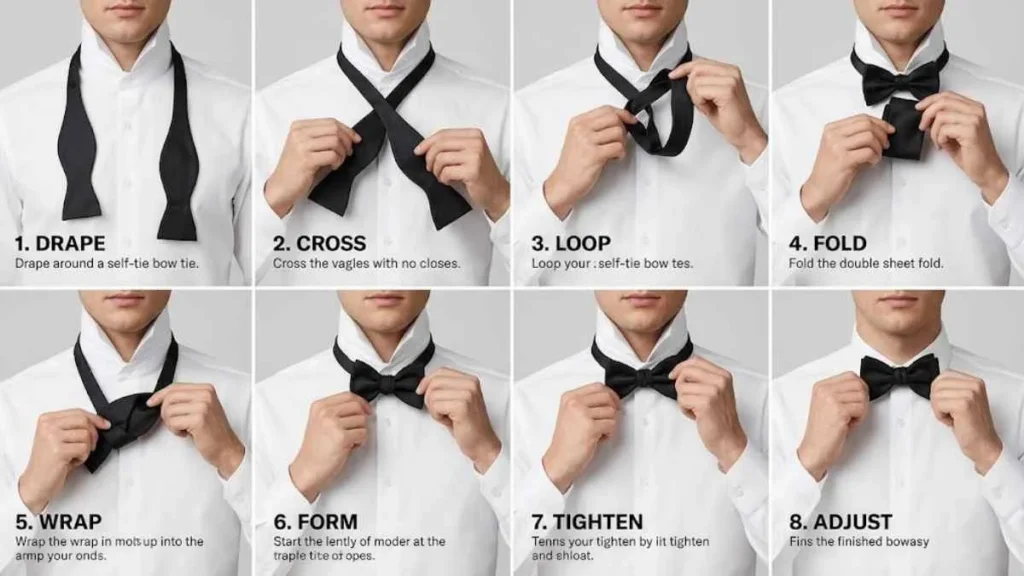
How to Tie a Bow Tie: Step-by-Step Instructions
Step 1: Drape the Bow Tie Around Your Neck
Place the bow tie around your neck with one end hanging about 1–2 inches lower than the other.
The longer end will do most of the work during the knotting process.
Step 2: Cross the Longer End Over the Shorter End
Cross the longer end over the shorter end to form an “X” shape just below your chin.
Hold the crossing point firmly with one hand.
Step 3: Pull the Longer End Through the Neck Loop
Bring the longer end up behind the shorter end and pass it through the loop around your neck.
Pull gently to create a snug foundation.
Avoid tightening too much; you’ll need some flexibility for later adjustments.
Step 4: Form the Front Bow Shape
Take the shorter end and fold it horizontally.
This folded section becomes the front part of the bow.
Hold it against your collar so it resembles a bow shape stretching from left to right.
Step 5: Drop the Longer End Over the Center
Allow the longer end to hang straight down over the center of the folded bow.
This creates the middle knot area.
Keep the folded bow shape firmly pinched.
Step 6: Create the Back Bow
Locate the folded section behind the hanging fabric.
Fold the hanging end back toward your chest to form another bow shape.
You should now have two folded wings, one in front and one in back.
Step 7: Push the Folded End Through the Loop
Behind the front bow, you’ll notice a small opening.
Push the folded back section through this opening.
Don’t force it. Gently guide the folded fabric through until both sides of the bow begin to appear.
Step 8: Tighten and Adjust
Pull the folded ends, not the loose tips, to tighten the knot.
Alternate between adjusting each side until:
- The bow looks balanced
- The knot sits centered
- The wings are even
- The tie feels comfortable around your neck
This final adjustment stage is where the bow tie truly comes together.
How Long Does It Take to Learn?
Most beginners can tie a bow tie successfully after 5–10 practice attempts.
A useful strategy is to practice several times before an event rather than trying to learn minutes before leaving the house.
Once mastered, the entire process typically takes less than a minute.
Styling Tips for Different Occasions
| Occasion | Recommended Bow Tie | Best Pairing | Quick Styling Tip |
| Black-Tie Events | Black silk butterfly bow tie | Tuxedo | Keep it classic with a hand-tied black bow tie. |
| Weddings | Silk or satin bow tie | Suit or tuxedo | Match the wedding theme without outshining the groom. |
| Business Events | Solid or subtly patterned bow tie | Tailored suit | Stick to understated colors like navy or burgundy. |
| Cocktail Parties | Velvet or textured bow tie | Blazer and dress trousers | Add personality with rich fabrics and subtle patterns. |
| Academic Ceremonies | Classic black or navy bow tie | Formal suit or academic attire | Keep the look traditional and elegant. |
FAQ
How tight should a bow tie be?
It should feel secure but comfortable. You should be able to fit a finger between the collar and your neck.
Should a bow tie be perfectly symmetrical?
No. Slight asymmetry is often considered a sign of a properly hand-tied bow tie.
How do I keep a bow tie centered?
Adjust both folded wings evenly and ensure the neck band is positioned correctly beneath the collar before tightening.
Conclusion
Learning how to tie a bow tie is one of those classic style skills that pays dividends for years. While the first attempt may feel awkward, the process quickly becomes second nature with a little practice. A properly tied bow tie adds character, confidence, and timeless elegance that pre-tied versions rarely achieve.
The key is patience. Focus on mastering the basic folds, practice a few times before an important event, and don’t chase perfection. The subtle individuality of a hand-tied bow tie is exactly what makes it look so distinguished.