

SFM compile refers to the process of rendering and exporting an animation or image sequence from Source Filmmaker (SFM) into a usable media file, such as an .mp4, .avi, or a sequence of .tga images. It is the final stage in your SFM workflow, where your carefully crafted timeline, models, lighting, and camera work are transformed into a finished product. This exported media can then be shared on platforms like YouTube, used for post-production editing, or included in larger creative projects.
For animators, filmmakers, and content creators, mastering the SFM compile process is crucial. A poorly optimized compile can result in long render times, artifacts, or poor-quality output, undermining weeks of effort. On the other hand, a properly executed compile ensures your animation shines with the highest possible quality, ready for both viewers and professional editing workflows.
Understanding Source Filmmaker
Source Filmmaker is a free 3D animation tool developed by Valve Corporation, powered by the Source engine. It combines the flexibility of a video editor with the real-time environment of a game engine, letting creators bring characters, props, and maps to life.

Whether you’re producing short films, memes, or cinematic projects, SFM allows you to animate in a timeline-based editor, with full control over lighting, camera angles, and audio. But the compile stage remains the bridge between creation and presentation.
What Happens During Compile?
In technical terms, compiling in SFM is a two-step process:
- Rendering: Frames are processed, lighting and textures are calculated, and visual effects are baked into the output.
- Exporting: The processed frames are saved into a chosen media format such as AVI, MP4, or TGA sequence.
This ensures your project can be distributed or taken into other programs for post-production.
Why is the Compile Stage Important?
The compile stage matters for several reasons:
- Final Presentation: This is where your project takes its final shape. Your lighting, camera angles, and animation choices become a cohesive media product.
- Compatibility: Raw SFM projects cannot be played outside the software. Compiling ensures your work can be shared universally through formats like MP4 or AVI.
- Quality Control: Compile settings directly influence visual quality, resolution, framerate, and compression. A professional compile ensures your animation looks sharp and cinematic.
- Post-Production Readiness: Exporting to formats like TGA image sequences enables further refinement in professional video editing tools such as Adobe Premiere Pro, DaVinci Resolve, or After Effects.
File Format Options in SFM
Below is a quick comparison of the main formats:
| Format | Description | Best Use Case | Downsides |
| AVI | Produces high-quality, often uncompressed video. | Ideal for professional editing. | Large file sizes. |
| MP4 | Widely supported compressed format. | Quick uploads to YouTube and social media. | Slight quality loss. |
| TGA Sequence | Exports each frame as a separate image. | Flexible for advanced editing or VFX. | Time-consuming, requires extra software. |
Step-by-Step Guide to SFM Compile
Here’s a simplified walkthrough of the SFM compile process:
1. Finalize Your Project
Before compiling, ensure that:
- Your timeline is complete.
- All lighting and shadows are properly baked.
- Camera paths and cuts are finalized.
- Assets are locked in place.
2. Open the Export Menu
- Navigate to the File → Export → Movie option in the top menu.
- This opens the Movie Export Settings window.
3. Choose Render Settings
Key settings to configure include:
- Resolution: Common choices include 1920×1080 (Full HD), 2560×1440 (2K), or 3840×2160 (4K).k
- Framerate: Typically 24, 30, or 60 fps, depending on the style and platform.
- Format: AVI, MP4, or TGA sequence.
- Compression: Uncompressed for editing, compressed for direct publishing.
4. Adjust Render Quality
- Enable high-quality shadows, ambient occlusion, and depth of field if desired.
- Check anti-aliasing options to smooth jagged edges.
5. Start the Compile
Click Export Movie to begin. Depending on the length and complexity of your animation, the process may take minutes to several hours.
6. Review the Output
- Play back the compiled file to check for glitches, missing frames, or compression issues.
- If errors appear, adjust settings and recompile.
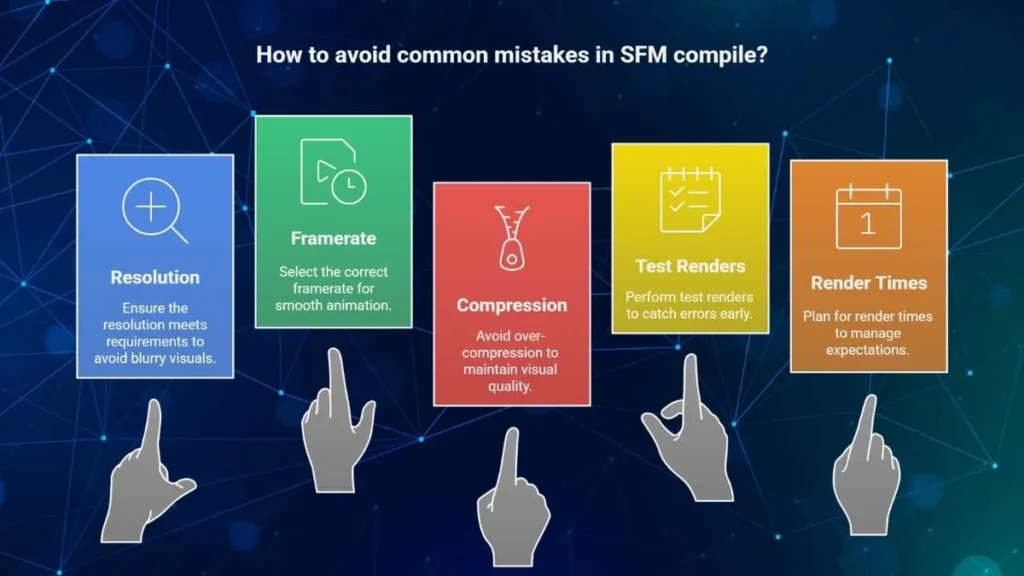
Common Mistakes to Avoid in SFM Compile
Many beginners face issues when compiling. Avoid these common pitfalls:
- Exporting at a lower resolution than required.
- Choosing the wrong framerate leads to jittery animation.
- Over-compressing in MP4 creates blocky visuals.
- Skipping test renders before doing the full compile.
- Underestimating render times, always plan.
Optimizing Performance
SFM compiling can be demanding, so small adjustments improve efficiency. Close background apps to free resources, use an SSD for faster saving, and keep GPU drivers updated. For longer projects, splitting the compile into smaller segments makes the process smoother and reduces errors.
Post-Production After SFM Compile
Once your animation is compiled, the next step is post-production. This may involve editing in tools like Premiere Pro or DaVinci Resolve, polishing sound with music and effects, and applying color grading for a cinematic touch. Finally, the file is exported in a web-friendly format for easy sharing or publishing.
Conclusion
The SFM compile process is more than just an export; it is the culmination of your creative vision. By understanding formats, mastering settings, and avoiding common mistakes, you ensure that your final render reflects the hours of dedication spent animating inside Source Filmmaker.
Whether you’re making a quick meme or a cinematic masterpiece, the compile stage determines how your audience experiences your work. With the right workflow, your SFM animations can rival professional productions, standing out with polished visuals and seamless playback.